Building a digital garden with Obsidian and Astro
I’ve previously blogged about my take on digital gardens, and on adding a new notes section on my blog. I’ve been using it for content that’s not quite polished enough to be a proper post, but that I still wanted to put out there, in case someone finds it to be of use.
The setup for a notes section on your blog is really important. You’ll want to make it as easy as possible to publish new notes and edit existing ones. If there’s any friction in the process, then you won’t be able to stick with it long term. I’ve settled on a setup that syncs between my notes in Obsidian and my Astro blog’s git repository, and I’m finding it super useful for me.
My current setup is three steps:
- I write my notes in a specific folder inside of my my Obsidian vault
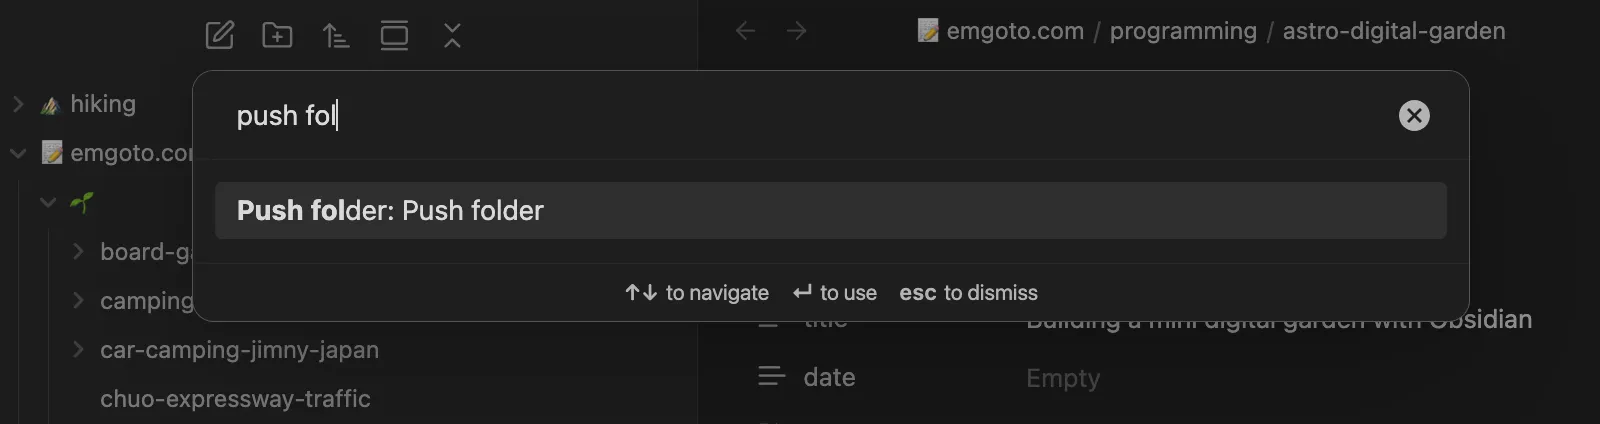
- I run a custom “Push folder” command in Obsidian, which copy-pastes my notes from Obsidian into a dedicated notes folder in my website’s git repo
- I open my terminal,
git add . && git commit -m "update notes" && git push
That’s it! If I want to edit a note, I will edit it in Obsidian, and then push it again to my blog.
I have Obsidian set up on my phone, work laptop and personal laptop, but only commit changes to my blog from my personal laptop. So this setup lets me edit my notes anywhere, and then I’ll push to my git repo the next time I’m on my personal laptop. You can imagine that if my notes lived purely in my website’s git repository, editing them would become more of a hassle.
Another benefit of having it linked up to Obsidian is that I have a lot of random notes in Obsidian vault already, so if I think it’s ready to become a published note, it’s as easy as dragging it into my specific notes folder. If my notes were in a completely different location, I feel like that extra barrier would make me less likely to publish my notes.
I only have this setup for my notes, but hypothetically you could do this flow for your whole blog if you wanted to. And although I use Astro, you could apply this to any static site generator or blogging framework that has a similar set up.
Writing an Obsidian plugin for a push command
So the most complex part of this setup (although overall it is still quite simple) was figuring out how to get my notes from Obsidian into my git repository for emgoto.com. You could do this step in the terminal if you wanted to, or even manually copy-and-paste via the file explorer, but I wanted to make it as easy as possible.
The best part about Obsidian is how customisable it is with its plugin options. At first, I looked for an existing plugin that I could use for this but couldn’t quite find one that suited my needs. The Markdown Blogger plugin came closest - it lets you push a single Markdown file from Obsidian into your blog.
Taking inspiration from that, I did a similar one that just copy-pastes an entire folder from one location to another. I decided to copy everything instead of just one file as it means I don’t have to keep track of which files in Obsidian needed to be updated.
I’ve put it up on my Github at obsidian-push-folder if you wanted to re-use it for yourself.
Making sure your notes are published in Astro
So the next step after the files end up in my git repository is making sure they are actually published. Astro has a concept of content collections, so any new file or folder I add to my content/notes file will get automatically published as a new page on my blog. So when I do my push command, I just make sure I push to this folder.
For Astro, you’ll first need to make sure you have your notes folder defined as a content collection in your content.config.ts file:
const notes = defineCollection({
    loader: glob({
        pattern: '**/[^_]*.{md,mdx}',
        base: './src/content/notes'
	}),
	schema: z.object({
		title: z.string(),
		date: z.coerce.date(),
		updated: z.coerce.date(),
	}),
});
And then you’ll need a [slugNotes].astro file which will loop through all the files in your notes content collection and generate a page for them. It doesn’t have to be named slugNotes, but the key part is using the square brackets [] around your file name.
---
import { type CollectionEntry, getCollection, render } from 'astro:content';

export async function getStaticPaths() {
    const posts = await getCollection('notes');

    return posts.map((post: CollectionEntry<'notes'>) => ({
        // The key point here is that your file name needs to match the param
        params: { slugNotes: `${post.id}` },
        props: post,
    }));
}

type Props = CollectionEntry<'notes'>;
const post = Astro.props;
const { Content } = await render(post);
export const prerender = true;
---
<Content />
Rendering a list of your notes in Astro
So you’ve published your note as a new page, but you’ll need to make sure it’s linked somewhere in your blog as well. I have a /now page where I link to my notes.
As a side note, my now page is actually also a part of the the “notes” section in my Obsidian vault, which makes it also really easy to update.
Wherever you decide to put your list, you just need to loop through all the pages in the notes folder (which is made easy by Astro’s getCollection API):
---
import { type CollectionEntry, getCollection } from 'astro:content';

const posts: CollectionEntry<'notes'>[] = await getCollection('notes');
---
<ul>
    {posts.map((post) => (
        <li>
            <a href={`/${post.id}/`}>
                {post.data.title}
                <div class="date">{post.data.updated || post.data.date}</div>
            </a>
        </li>
    ))}
</ul>
And it’s as simple as that!
Obsidian tips
So if you’re using Obsidian, you’ll want to make the most of its extensive plugin ecosystem. Here’s two that I find useful for my notes.
Use a draft template
With templates you can make your life a little bit easier when creating a note, as it can automatically insert your title and date front matter (and whatever else you use in your blog) e.g.
---title:date:---There is a Templates core plugin maintained by Obsidian that you can toggle on via your Obsidian Settings. You just need to make a templates folder and a file with the above template.
Alternatively, there is another third-party plugin called Templater that has a lot more features, like:
- The ability to automatically populate the
datefield with today’s date - When using a specific template, it will automatically create the file in a specified folder
Automatically updating the “updated” date
If you are frequently editing your notes, you can have an updated value that will get automatically overridden with today’s date whenever you modify it. You can then render this on your note with when it was last updated.
I use a plugin called Update frontmatter modified date for this.
Why I don’t use Obsidian for my entire site
When I first started using Obsidian, I was quite excited by the idea of having my entire blog setup in Obsidian. However Obsidian is meant for Markdown posts, and my blog is entirely written in MDX, a slightly fancier version of Markdown which lets you insert components.
And unfortunately, Obsidian doesn’t play nicely with MDX! There are plugins like mdx as md which let you edit MDX files from within Obsidian. But all other plugins only work with Markdown files, like one to update the “updated” date like I mentioned above. So this kind of reduced Obsidian’s usefulness for me. In the end I decided to leave the rest of my blog in git.
MDX is compatible with Markdown, so if I convert a note from a note to a full-fledged post, I just change the file extension from .md to .mdx.
A final note on some alternatives: Quartz and Obsidian Publish
If you’re starting from scratch with your digital garden, Quartz also seems like a great option as it lets you convert your Obsidian vault into a full website. Obsidian also has its paid Obsidian Publish feature which lets you publish your Obsidian vault as well.
Obviously since I’m working with an existing blog, neither of those options really work for me (and I also much prefer having my own setup since I can customise it however I like).